
Hello Students, Welcome to our new blog in this blog you will get the M1 r5 practical questions with answers. At the end of the blog i will provide some practical exam questions link so must checkout the links.
Question 1: Create a Data Validation using Spreadsheet for the range A1:B5 so that only the numbers between 1 and 500 can be written in this range. For the same range, specify an input message “Enter any number between 1 and 500” and specify an error message, which will appear when a wrong value is entered in the range.
लिखी जा सके। उसी रेंज के लिए, एक इनपुट संदेश स्पेशिफाई करें Enter any number between 1 and 500 और A1: B5 रेंज के लिए स्प्रेडशीट का उपयोग करके डेटा वैलिडेट करें ताकि इस रेंज में केवल 1 और 500 के बीच की संख्या एक त्रुटि संदेश निर्दिष्ट करें, जो कि रेंज में गलत वैल्यू दर्ज करने पर दिखाई देगा।
Answer1:
- Firstly open LibreOffice calc. सबसे पहले लिब्रे ऑफिस कैल्क खोलें।
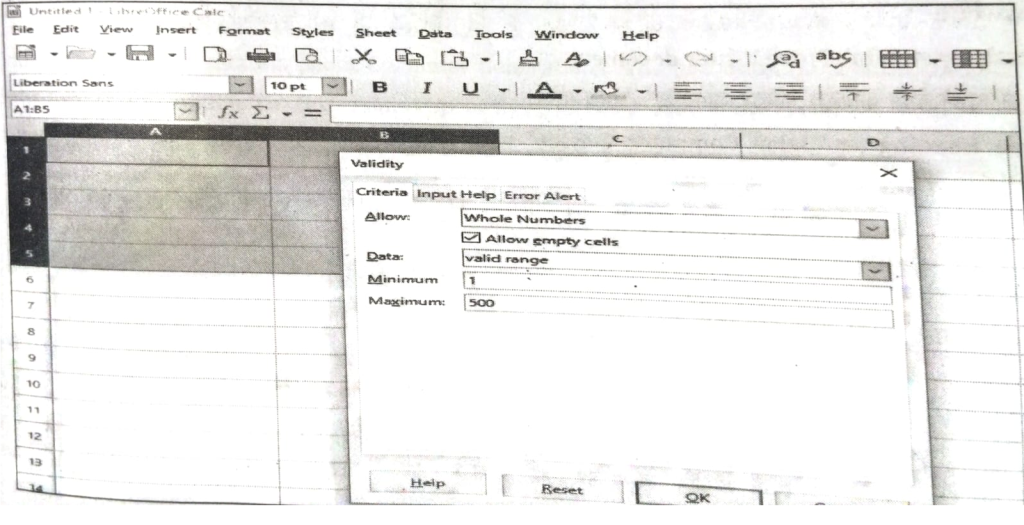
- Select range from A1: B5 then Go to Data > Select Validity -> Then Validity dialog box will appear
on your screen.
A1: B5 रेंज चुनें फिर डेटा मेन्यू पर जाएं-वैलिडिटी चुनें-फिर वैलिडिटी डायलॉग बॉक्स आपकी स्क्रीन पर दिखाई देगा।
- In this dialog box, Select Whole Numbers in Allow list. Then select Valid Range in the Data field list. And Type Minimum value 1 and Maximum value 500.
इस डायलॉग बॉक्स में, Allow सूची में Whole Numbers चुनें। फिर Data फील्ड सूची में Valid Range का चयन करें और Minimum वैल्यू 1 और Maximum वैल्यू 500 टाइप करें।
- For the same range to specify an input message, Go to Input help tab in the validity dialog box, And type ” Enter Any Number between 1 and 500″ in the Input help field.
समान श्रेणी के लिए, इनपुट संदेश स्पेशिफाई करने के लिए validity डायलॉग बॉक्स में Input help टैब पर जाएं, और Input help फील्ड में “Enter Any Number between 1 and 500” टाइप करें।
- To Specify an Error message, Go to Error Alert tab in the Validity dialog box, And type Error message “Wrong value”. And click on OK button.
एक एरर मैसेज स्पेशिफाई करने के लिए, Validity डायलॉग बॉक्स में Error Alert tab पर जाएं, और एरर ज
“Wrong value टाइप करें। और ओके बटन पर क्लिक करें।

Question 2: Create a presentation about Computer Generations. The presentation should contain 5 slides, one for each generation. The text should appear flying in when slide show is run.
कंप्यूटर जेनरेशन के बारे में एक प्रेजेंटेशन बनाएं। प्रेजेंटेशन में 5 स्लाइड होनी चाहिए, प्रत्येक जनरेशन के लिए एक स्लाइड यो चलाते समय टेक्स्ट उड़ते हुए दिखना चाहिए।
Answer 2:
- Firstly open LibreOffice Impress.
सबसे पहले लिब्रे ऑफिस इंप्रेस खोलें।
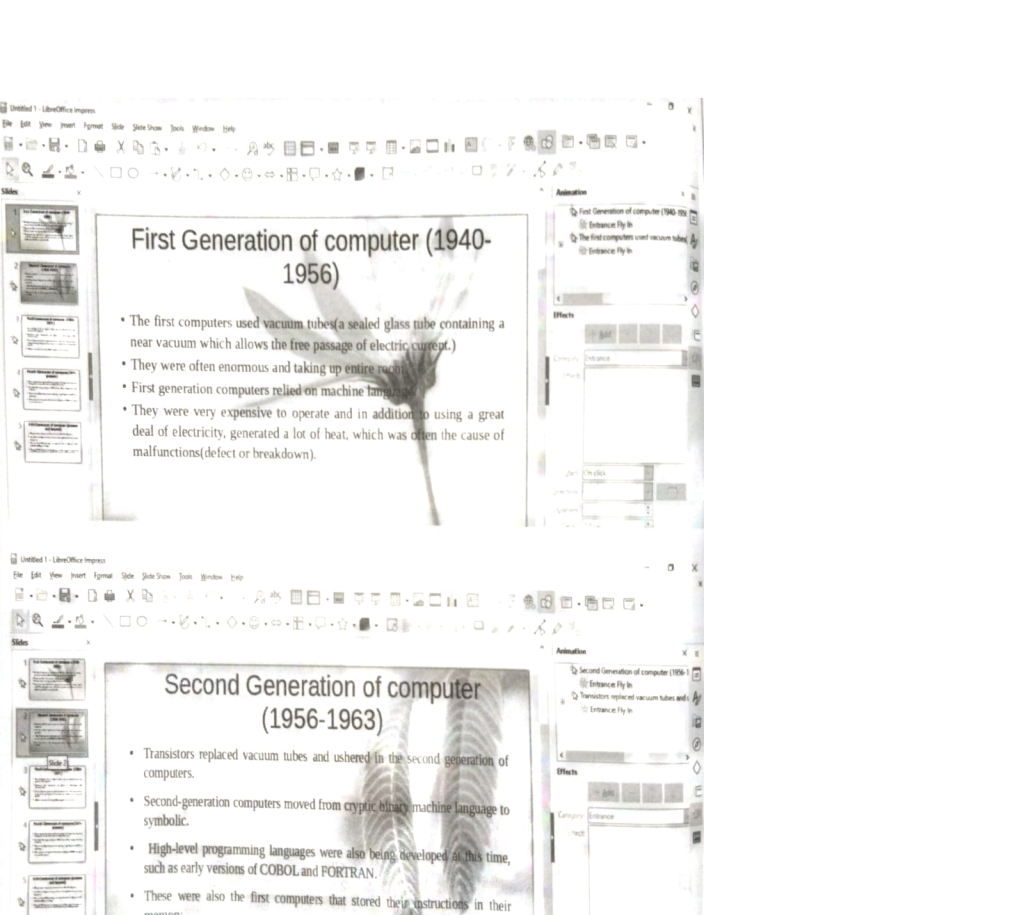
- In All slides, Type Title & its content, as shown in the below figures.
सभी स्लाइडो में, शीर्षक और उसके कन्टेन्ट टाइप करें जैसा कि नीचे दिए गए चित्रों में दिखाया गया है।
- Then to apply Fly in Animation Effect, select Title or its content of the slide in which you want to apply animation, Click on animation Tab from the sidebar of the LibreOffice Impress & Click on Add(+) button-> Select Fly in from drop down list, as shown in the below figure.
फिर एनीमेशन इफेक्ट Fly in लागू करने के लिए, शीर्षक या स्लाइड के कन्टेन्ट का चयन करें जिसमें आप एनीमेशन लगाना चाहते है और लिब्रे ऑफिस इंप्रेस के साइडबार से एनीमेशन टैब पर क्लिक करें और और Add(+) बटन पर क्लिक करें और ड्रॉप डाउन सूची से फ्लाई इन का चयन करें, जैसा नीचे दिए गए फीगर में दिखाया गया है।
To Slide Show the Presentation
Go to Slide show menu->Select start from first slide or Press F5 key and press Enter key to display the next content of slide.
Slide show मेनू पर जाएं -> Start from first slide का चयन करें या F5 कुंजी दबाएं और स्लाइड के अगले कन्टेन्ट को प्रदर्शित करने के लिए और एंटर कुंजी दबाएं।
To Set the Background Image into the slide
Go to Slide menu->Select Set Background Image then Set Background image dialog box will appear – >From this dialog box, select any image which you want to apply as a slide background & Click on Open button.
इस डायलॉग बॉक्स से किसी भी इमेज का चयन करें जिसे आप स्लाइड बैकग्राउन्ड के रूप में लागू करना चाहते हैं और स्लाइड मेन्यू पर जाएं-> Set Background Image चुनें फिर Set Background image डायलॉग बॉक्स दिखाई देगा->ओपेन बटन पर क्लिक करें।
For Live Class Subscribe Our Youtube Channel Link is given below-
Thanks For Reading the Article M1 r5 practical questions with answers
Also Check Our Latest Uploads
o level practical exam question paper